et's say you're relaxing some evening, enjoying a few homebrews, and shopping eBay. With some beer logic, you click BuyNow on a digital thermometer for $1.83 (free shipping!) from a seller named Hola-Fly in China. Let's say, you forgot you ordered it and eight weeks later it surprises you in the mail ...but to no surprise it's not very accurate.
Okay, let's say I did this.
My plan was to install it in my beer fridge so I could keep an eye on my beer temp. If Coors Light drinkers can have their "certified cold" mountains, I should at least have a thermometer. Unfortunately this cheap little thermometer measured about 4°C too warm. And of course, since it costs less than a large coffee, there is no setting to calibrate it.
The probe is likely a simple thermocouple but could be a resistance thermometer - either way it's effectively a variable resistor affected by temperature. I figured I might be able to increase the resistance to get the results I needed.
I cut the lead and spliced in a 5KΩ trimpot (trimmer potentiometer) to one of the wires and dropped it in the fridge along with another thermometer that I trust. Waiting 10-15 seconds after each adjustment, I tweaked the trimpot until I was consistently getting the correct reading. With the trimpot removed, I measured it to be set to 2.2KΩ. I didn't have a 2.2KΩ resistor ( ▌▌▌) so I used a 1.2KΩ ( ▌▌▌) and 1KΩ (▌▌▌) in series. A little soldering and heat shrink and it's all good.
I should point out, this isn't really "calibrating". I just increased the resistance across the entire range - I'm betting it's not a linear relationship between the temperature and the resistance. However, it's now pretty accurate in the 0°C - 10°C range (above 10°C it starts to deviate). Good enough for a beer fridge.
Gerhard Baecker, schooled in Wolfsburg, Germany, now teaches Volkswagen in the United States. Like most teachers, Gerhard be-lieves in what he teaches. He shares whole-heartedly the Volkswagen philosophy: the car is only as good as the service it gets.
As a result, you'll find Volkswagens are serv-
iced only by graduate mechanics trained to demanding Volkswagen standards.
Volkswagen service is fast. Your Volkswagen engine can be removed and replaced in 90 minutes. A fuel pump installed in 20.
Every authorized Volkswagen dealer has a complete inventory of VW parts on hand.
There's no wait, no substitution.
Volkswagen parts are inexpensive. A new front fender is $21.75,* a cylinder head $19.95.*
If you've been thinking about buying the Volkswagen, isn't it nice to know the service is as good as the car?
No point showing the '62 Volkswagen. It still looks the same.
No heads will turn when you drive a '62 Volkswagen home.
(Maybe an eagle-eyed neighbor will notice that we've made the tail lights a little bigger. But that's the only clue.)
Everything is right where we left it in '61. Including the price: $1,595.*
Inside is another story.
We've put all our time and effort into
improvements that matter.
The '62 VW runs more quietly. There are new clutch and brake cables (as well as new steering parts) that never need maintenance. Heater outlets front and rear for more even heating. Easier braking.
And 24 more.
One change is literally a gasser.
We've added a gas gauge. Our first.
A few die-hards may think we've stolen some of the VW's sporting flavor. But the gas gauge may be more useful than you'd imagine. It will not only tell you whether your tank is E or F; it will prove you're
driving a '62.
It could make 1962 go down in VW history as the year of the big change.
In conventional cars, a front engine turns the rear wheels through a long drive shaft.
But Volkswagen's rear engine gives direct power to the wheels, saving weight and power. It is the most efficient and eco-nomical design. It means greater visibility when driving - you see over VW's snub nose. And the rear engine gives your rear wheels better traction. In mud, sand, ice,
snow, where other cars skid, you go.
Its location, however, is the least un-usual feature of a Volkswagen engine. For one thing, it is air-cooled, an astonish-ing advantage when you think about it. No water to boil over in the summer, or to freeze in winter. No anti-freeze needed. No radi-ator problems.
The engine is ingeniously cast of alu-minum and magnesium alloys and is very
light and powerful; undoubtedly the toughest 198 lbs. going.
It is beautifully machined for minimum friction; you will probably never need oil between changes. And so efficient that top and cruising speeds are the same.
Your VW runs at 70 mph all day without strain. You get an honest 32 miles to the gallon (regular gas-regular driving).
ike most vintage Porsche owners, I found myself dealing with a faulty ignition switch.
For the last year or so, intermittently it had not been working, then intermittently it worked, and finally it became a bit of a lottery. All key positions were functioning except the last click - engine start.
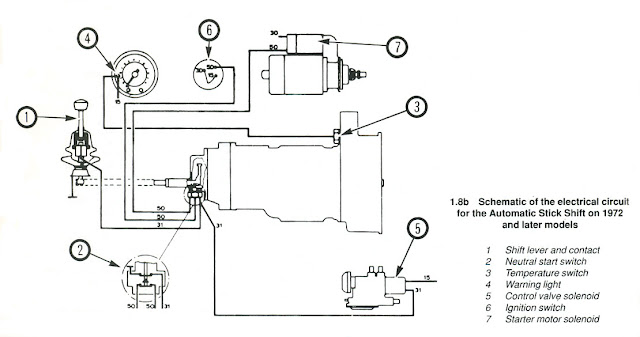
After reading about the common failure of the electrical portion of the ignition switch (#2 in diagram), I overnighted a replacement. Grabbing my favourite Porsche DIY book - Wayne R. Dempsey's 101 Projects for Your Porsche 911 - I flipped to page 212, Project 91 - Replacing Your Ignition Switch (Google Books and Pelican Parts have some of it online - but you really should buy the book!)
My first challenge was to remove the two shear bolts (#5 in diagram). A shear bolt is a type of security fastener with a head that breaks away after tightening to prevent easy/criminal removal. After some careful drilling and using a Mastercraft GraBit I managed to back out the bolts without needing to remove the steering wheel.
Removing the shear bolts
With a glowing sense of accomplishment I installed the new switch... and had the same problem.
With a now deflated sense of accomplishment, I deciding it would be wise to actually diagnose the problem. First I checked all ground straps and battery terminals. Then I decided to test for power at the solenoid. The main line showed a strong 12.4V but the other two wires were flat when the key was turned to the start position - so I knew it likely wasn't my starter/solenoid.
I then tested the electrical portion of the ignition switch separate from the mechanical portion (what I should have done to begin with) by turning it with a Phillips screwdriver... Eureka! the engine roared to life. I now knew it was the mechanical portion (#1 in diagram) that was faulty.
Looking closely at it, I noticed it wasn't turning quite far enough, maybe 15° short of the full start position.
After several days of driving with the electrical switch swinging by my knees and a Phillips stubby in the ash tray, I figured I either need to dish out the $600-700 for a new ignition switch or try to repair the one I had. If I were to buy a new one I'd need to open it up to rekey it, so I decided to disassemble the old one as practice with hopes of maybe finding an easy fix.
To release the key barrel/tumbler, I used a 1/64" bit to drill out the single pin. With the barrel out I could see it was showing some age and was a bit sloppy.
At the tail-end of the tumbler there are two plates that turn with the key - the thicker outer one turns with the key and the thinner, inner one turns a bit out of sequence. Mine were turning at the same time.
In a functioning mechanism, when turned clockwise, a spring-loaded pin clicks into a hole and turns the inner plate. Then when turned counterclockwise, the pin pops into a notch on the outer disk, preventing it from being turned clockwise again until turned all the way back. This "start lockout" prevents the car from being restarted after it's already been started.
Without taking the tumbler apart, I tightened things up significantly by hitting the two pins at the back with a hammer and punch.
To save the next guy (or future me) some trouble, I tapped the pin hole and replaced the pin with a cone point set screw. Also, when installing the ignition back in the car I used regular bolts instead of the OEM shear bolts.
My motive with this blog is to be a contributor to this answer-machine we call the Internet.
I am an avid problem-solver and a believer in doing-it-yerself (DIY). With good research, creativity, the right tools and some patience, there is not much that can't be done with your hands.


 If you've been thinking about buying